Accuracy in Measurement
Upon completion of this exercise, you should be able to:
- Define percentage error and state the percentage error tolerated in most prescription formulas.
- Calculate the potential percentage error for weighing a stated amount of a substance given the sensitivity of the balance.
- Define least weighable quantity.
- Calculate the least weighable quantity for any balance, given the allowed percentage error and the sensitivity of the balance.
- Describe and/or demonstrate the proper techniques for using the Class III prescription balance and corresponding weights to measure solid or liquid substances with an error of measurement not to exceed >5%.
- Differentiate between volumetric/nonvolumetric and TD/TC glassware or devices.
- Select glassware/liquid measurement devices which are appropriate for a particular measurement operation.
- Describe and/or demonstrate the proper techniques for using pipets, syringes, and graduates for measuring and delivering liquids.
- Given the specific gravity or density of a compound, or references in which to locate these, perform calculations to convert the weight of the compound to its corresponding volume (or volume to corresponding weight).
Two of the most crucial steps in compounding any pharmaceutical product are the accurate calculation and measurement of the component ingredients of the formulation. In order to carry out these critical functions, the pharmacist must have a working knowledge of three systems of measurement: the Metric system, the Apothecary system, and the Avoirdupois system.
The Metric System
The metric system is the preferred and most frequently used system of measurement in pharmacy. Since it is a decimal system, other denominations of measure in the system are easily and quickly generated as a 10nth multiple at the basic unit. To convert from larger to smaller units, one need only move the decimal the appropriate number of places to the right. The decimal is moved to the left to convert from smaller to larger units.
The Apothecary System
The Apothecary system was commonly used in the past by pharmacists and physicians as the system of weights and measures for prescribing and dispensing medications. Although it has largely been replaced by the less cumbersome metric system, the pharmacist still encounters these symbols in his/her routine practice. Indeed, the apothecary system of fluid measure is still commonly used in a variety of products, both pharmaceutical and nonpharmaceutical, and everyone should be familiar with the fluid ounce, pint, quart, and gallon.
Since quantities of ingredients in the Apothecary system are commonly written in Roman rather than in Arabic numerals, you should recall the following:

The Avoirdupois System
The Avoirdupois system is a system of weight measurement only. Its basic unit, the grain, is the same as in the Apothecary system. The Avoirdupois ounce and pound differ in weight and symbols from those in the Apothecary system. The Avoirdupois pound is the pound to which we are all accustomed in our daily lives. It is also the weight measure in which bulk chemicals and over the counter pharmaceuticals are bought and sold. It is important to make this distinction from weights in the Apothecary system, which are used only in the prescription or medication order.
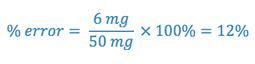
It is generally agreed that pharmaceutical products should be prepared with a low percentage of error. The official compendia allow a tolerance of ± 5% for most formulas, although greater accuracy may be required for very potent drugs with greater toxicity potential. This same degree of accuracy is expected in all extemporaneously compounded products.
Most pharmaceutical products allow for a tolerance of only 5% error, where

If we know the sensitivity of the balance (i.e. the potential error) we can calculate the percentage of possible error when any amount of the substance is weighed.

e.g. The Class III prescription balance has a sensitivity of 6 mg. What % of error would result in weighing 50 mg of a drug on the balance?
Similarly, we can calculate the smallest quantity that can be weighed, on a balance of known sensitivity, to maintain a desired level of accuracy. This weight is referred to as the least weighable quantity (L.W.Q.).

e.g. What is the least weighable quantity that will result in an error of 5% or less on a Class III prescription balance?

You should keep this figure in mind for the remainder of your career. When a prescription formula calls for the incorporation of a component weighing less than 120 mg, special methods must be employed to obtain that weight of the component. If a liquid dosage form (solution, suspension or emulsion) is being prepared, the liquid aliquot method is employed. When the component must be incorporated as a solid into powders, tablets, capsules, or pastes, the trituration method is used.
Class III Prescription Balance
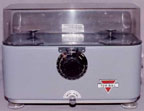
Most pharmacists will make their weight measurements on a Class III prescription balance. In fact, pharmacies are required by law to have such a balance in their facility. Hence, it is important to understand the limitations of this balance so that you can use it properly to maximize dosing accuracy.
The Class III Prescription Balance is a 2 pan torsion type balance which utilizes both internal and external weights. It requires the use of external weights for measurements exceeding 1 g. Although extremely durable and relatively simple to use and maintain, the balance is less sensitive than the analytical balances you have probably used in the past. The Class III Balance has a sensitivity requirement of 6 mg, meaning that as much as 6 mg could be added to or removed from the pan before the balance marker will move 1 division. Most have a maximum capacity of 120 g and bear a statement to that effect. When no information is given, the capacity is assumed to be at least 15 g. No less than 120 mg may be weighed on the balance to maintain an error of < 5%.
The Class III Prescription Balance is manufactured to meet the requirements of the National Bureau of Standards (NBS). In general, the balance must have the following:
- A metal identification plate indicating the serial number, model number, sensitivity, and maximum capacity of the balance (on back or side of balance).
- Removable weighing pans which are of equal weight, and free of dirt and corrosion.
- A device, usually leveling screws, which may be used for leveling the balance.
- A lid to protect the balance from dust and permit draft-free weighing.
- A mechanical beam (oscillation) arrest to allow the operator to add or remove weight without jarring the damaging the balance.
- A graduated beam, equipped with a rider, or direct reading dial capable of measuring 1 g in 0.01 g increments. The beam or dial must have a “Stop” at the zero point. (Note: most balances are calibrated in grams and grains. Take care to read the appropriate scale!).
- An appropriate index and pointer to determine rests points.
Operating a Class III Prescription Balance
In order to obtain an accurate weight of components on the prescription balance, appropriate techniques must be used. The following steps should always be taken to insure accuracy. Click on a picture in order to see a larger view of that picture.
![]() View a video demonstration on how to use a prescription balance.
View a video demonstration on how to use a prescription balance.
 |
1. Arrest the balance by turning the arrest knob. Level the balance (front to back) by turning the leveling screw feet all the way into the balance and then moving them the same direction until the 4 sides of the balance are equidistant from the bench. |
 |
2. Set the internal weights to zero. This is done by turning the calibrated dial to zero. |
 |
3. Level the balance (left to right) by adjusting the leveling screw feet. To shift the pointer left, grasp both the screw feet between the thumbs and forefingers and rotate so that thumbs move inward. To shift the pointer to the right, rotate both screw feet so that forefingers move toward back of the balance. Continue adjusting the screw feet slowly until the pointer rests at the center of the index or swings equal distances to the right and left of the center. |
 |
4. Place one weigh boat on each weighing pan. The small weigh boats will hold up to 2 g., while the larger weigh boats will hold up to 30 g. |
 |
5. Unlock the balance by releasing the arrest knob and note the rest point of the pointer on the index. If the pointer does rest at the center of the index, then it will be necessary to level the balance left to right. |
 |
6. Arrest the balance and place the required weights on the right pan. Place the material to be weighed on the left pan. |
 |
7. Release the balance and note the shift of the pointer on the index. If the pointer shifts left, too much of the substance is on the pan and a portion should be removed. If it shifts right, there is too little of the substance and more should be added. Using a spatula, remove or add material; arrest the balance each time before a transfer is made. |
Once you are satisfied that you have made an accurate measurement, double check to make sure that you have weighed the correct substance (check the label) and that you have used the correct weights (internal and external).
Precautions:

- Always use weigh boats on both pans to protect the pans from abrasions, eliminate the need for repeated washing, and reduce loss to porous surfaces (this is especially important when weighing small quantities). The boats should be of reasonable size, giving a maximum weighing area without touching any part of the balance except the pan. A clean boat should be used for each new ingredient to prevent contamination of components. It is imperative that the balance be adjusted after a weigh boat has been placed on each pan. Small weigh boats taken from the same box can vary in weight by as much as 30 mg, and the larger boats can vary by as much as 200 mg. If the zero point is not established after the boats are placed on the pans, a great error can be incurred when weighing your substance.
- Always arrest the balance (i.e. lock the pans in place) before adding or removing weight from either pan. Although the balance is noted for its durability, repeated jarring of the balance will ultimately damage the balance and reduce its accuracy.
- Always clean the balance, close the lid, and arrest the pans before storing the balance between uses. This simple step will prolong the functional life span of the balance.
Balance Weights

A proper set of metric weights (Class C or better) is essential for prescription compounding. These sets usually contain cylindrical weights ranging from 1-50 g and fractional weights of 10-500 mg. Weights should be stored in a special box and must be handled with forceps, NOT with the fingers to prevent soiling and erosion of the weights. Apothecary weight sets are also available and are convenient to use when the prescription is written in the Apothecary system.
The pharmacist is concerned with liquid measurement from two perspectives. First, he/she should be concerned with the ability to accurately measure the components of a prescription preparation. Secondly, he/she must be concerned with how the patient will measure and deliver an accurate dose of a liquid medication.
The techniques used to measure liquids are probably the simplest of the operations related to prescription compounding. At the same time, they are also the most susceptible to errant selection and unprofessional execution leading to inaccuracies. In this section, we will consider factors which influence selection of liquid measurement devices.
Precision volumetric glassware is used to measure and/or deliver exact volumetric quantities of liquid substances. The capacity of the vessel (1 ml, 50 ml, 1000 ml, etc.) is inscribed on the vessel, and some types of devices will have calibration marks for measuring multiple volumes. The inscriptions TD or TC mean, respectively, “to delivery” and “to contain”. A moment’s reflection should indicate the significance of these designations as they apply to the function of the glassware. Calibrated pipets, burets, syringes and droppers are T.D. glassware; volumetric flasks and cylindrical or conical graduates are T.C. glassware although in practice, graduates are used as T.D. vessels for volumes of 1 ml or more.
Erlenmeyer flasks, beakers, and prescription bottles, regardless of markings, are NOT volumetric glassware, but are simply containers for storing and mixing liquids. The designated volume(s) express the approximate capacity of the vessel.
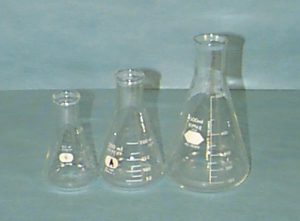 |
 |
 |
| Erlenmeyer flasks | Beakers | Prescription Bottles |
Pipets
Pipets are recommended for the delivery of all volumes <5 ml and are required for delivering volumes <1 ml (in the absence of an appropriate syringe). There are two basic types of pipets:
- The single volume or transfer pipet is the most accurate and simplest to use type, but is, obviously, limited to measurement of a fixed, single volume. Generally, these pipets deliver their inscribed volume by complete drainage of the pipet from an etched mark. They are normally used for the accurate transfer of 1.0, 2.0, 5.0, 10.0, and 25.0 ml of liquid.

Graduated Pipets 
- The Mohr, or graduate multiple volume pipet, is graduated from a point near the tip to the nominal capacity of the pipet. Thus, it can delivery multiple volumes of liquid with good volumetric precision. From a practical economic stand point, the Mohr pipet is generally the preferred instrument for compounding.
A pharmacist can accurately compound any prescription requiring relatively small volumes of liquid if he/she has just three basic sizes of Class III Mohr pipets available:
-
- 1 ml Mohr pipet, subdivided in 1/100 ml
-
- 2 ml Mohr pipet, subdivided in 1/10 ml
-
- 5 ml Mohr pipet, subdivided in 1/10 ml
Measuring Techniques
1. Single volume pipets
- Using a respirator (rubber bulb) for suction, draw the liquid into the pipet until it is above the graduation. Caution: Since we may be using corrosive or poisonous liquids mouth pipeting is strictly prohibited in the pharmaceutics lab.
![]() View a video demonstration on how to use a pipet bulb.
View a video demonstration on how to use a pipet bulb.
- Remove the pipet from the stock solution.
- Wipe the end of the pipet with a tissue or Kim wipe.
- While holding the pipet in a vertical position, release pressure, allow the liquid to flow into a beaker (or other vessel) until the bottom of the meniscus coincides with the etched line. Droplets which remain suspended from the tip can be removed by touching the inside of the beaker with the tip of the pipet.
- Allow the pipet to drain for 30 seconds (or up to 5 minutes for viscous liquids) while touching the tip of the pipet to the inner side of the receiving vessel.
2. Mohr (graduated or calibrated) pipets
- The manipulations are essentially the same as with single volume pipets except that fractional volumes may be transferred by noting the meniscus level before and after delivery. Thus, 1.50 ml may be delivered after observing an initial reading of 8.50 ml by allowing the liquid to flow until the meniscus reaches 7.00 ml. When working with viscous materials, it is necessary to check the final reading after waiting approximately 1 minute. (This can be very tricky!) It should be noted that the final graduation of a Mohr pipet is usually some distance above the pipet tip so that delivery is performed from graduation to graduation and not from graduation to tip as with the single volume pipet. Make certain that you know which type of pipet you are using to ensure accurate delivery.
Syringes
Hypodermic Syringes
Hypodermic syringes come in a variety of sizes ranging from 0.5 ml (calibrated 0.01 increments) to 60 ml (calibrated in 2 ml increments). Syringes may be used to deliver a wide range of liquid volumes with a high degree of accuracy. They are especially useful for measuring and delivering viscous liquids.


The table below indicates that measurements made with syringes are more accurate and precise than those made with graduated cylinders. Besides being easy to operate, these syringes are unbreakable and economical. They are applicable in other experiments as long as the reagents do not react with the chemicals used to manufacture the syringes.
| Volume of Water Delivered by Graduate Cylinder and Plastic Syringe | ||
|---|---|---|
| Actual Volume Delivered | ||
| Nominal Volume (mL) | 10-mL Graduated Cylinder | 10-mL Plastic Syringeb |
| 1.0 | 0.94 ± .03a | 1.01 ± .02b |
| 5.0 | 4.94 ± .04 | 4.98 ± .03 |
| 10.0 | 9.75 ± .03 | 9.95 ± .02 |
| 10.0 | -� | 9.98 ± .02 |
aStandard deviations were obtained from five trials, except for the last entry where five different syringes were used with one trial each.
bWith Luer-Lok tip, manufactured by Becton-Dickinson and Co., Rutherford, NJ.
Oral Syringes
Oral syringes are also available as a device for accurately providing a dose of liquid medication to the patient. They are especially useful with children and elderly adults who frequently require nonstandard doses, and for whom accuracy of dose is most critical.

Measurement Techniques with Syringes

Fluids are pulled into the syringe by pulling back on the plunger. The tip of the cannula (needle) must be fully submerged in the fluid to prevent drawing air into the syringe.
The tip of the plunger is covered by latex. The point at which the latex presses against the wall of the syringe barrel forms a line or guide that is lined up with graduation marks on the side of the barrel to determine the volume that will be delivered when the plunger is depressed.
Generally speaking, an excess of solution is drawn into the syringe so that any air bubbles may be expelled by holding the syringe cannula end up, tapping the air bubbles up into the hub, and depressing the plunger to expel the air. This ensures that the hub and cannula will be completely filled with solution and the volume of delivery will be accurate. Serious dosage errors can occur by failure to consider the volume of solution contained in the hub and cannula of the syringe.
Syringes come in a variety of sizes. Like graduates and pipets, they provide for the most accurate measurement when the capacity of the syringe equals or barely exceeds the volume to be delivered. Cannula sizes also vary, both in length and diameter. For the purpose of measuring viscous liquids, one would chose a syringe with a short, large diameter cannula OR remove the cannula altogether.
Graduates
Graduates are used for measuring and transferring liquids in a manner that is less precise than with a pipet. When appropriately used, graduates may be used to measure and deliver volumes over 1 ml of most liquids with an acceptable level of accuracy. As a general rule, a graduate should be used which has a capacity equal to or just exceeding the volume to be measured (e.g. 50 ml of liquid should be measured in a 50 ml graduate, not a 100 ml graduate). Graduates for pharmaceutical compounding may be either conical or cylindrical, the latter being the more accurate and preferred device. Studies have indicated that accuracy is improved when the lower portions of the graduate are not used.
 |
 |
| Graduated Cylinders | Conical Graduates |
The following table gives the minimum volumes that should be measured for a given potential error for a given cylinder size.
Most states specify the size and number of graduates which must be on hand in a registered pharmacy. As a rule, the required graduates will include all legal sizes up to 500 ml. In all instances, these will represent the minimum necessary equipment for proper compounding.
| Capacity of Graduate, ml | 2.5% Error, ml | 5% Error, ml |
|---|---|---|
| 5 | 3.0 | 1.5 |
| 10 | 4.4 | 2.2 |
| 25 | 11.8 | 5.9 |
| 50 | 15.8 | 7.9 |
| 100 | 20.9 | 10.5 |
| 250 | 36.3 | 18.2 |
| 500 | 66.5 | 33.2 |
| 1000 | — | 200.2 |
Goldstein and Mattocks, J. Am. Pharm. Assoc., Pract. Ed., 12:421 (1951).
Measurement Techniques
Pharmaceutical graduates are available in both cylindrical and conical varieties. Cylindrical graduates are generally considered to be more accurate than conical graduates. The following steps will help to maximize accuracy when using cylindrical or conical graduates.
- Hold the selected graduate by the base with the left hand (for a right handed person) and elevated so that the desired mark is at eye level.
- Hold the stock bottle with the right hand (label face up), and pour the liquid to be measured into the center of the graduate, to avoid error resulting from the adherence of material to the wall (especially with viscous liquids).
- As the surface of the liquid approaches the desired mark, decrease the flow rate or use a dropper or pipet to bring to final volume. The final volume should be determined by aligning the bottom of the meniscus with the desired graduation mark. If the liquid is densely colored or opaque, such as a suspension, the top of the meniscus should be read.
- Transfer the liquid from the graduate to the appropriate vessel or container, allowing about 15 seconds for aqueous and hydro-alcoholic fluids to drain. Approximately 60 seconds (or more) are required for more viscous liquids such as syrups, glycerin, propylene glycol, and mineral oil to drain.
Errors in measuring may occur if the operator tilts the graduate or fails to read the meniscus properly. Failure to perceive the true bottom of the meniscus is a common source of error when measurement is taken against a light background. A more suitable background consists of a broad black band on a white background.

Precautions
- While graduates are volumetric devices, they should not be used for dissolving solids in liquids. A solution should be prepared in a container such as a beaker or flask, and returned to the graduate for adjustment of final volume.
- Do NOT assume that the final volume of a prescription will be represented by the sum of the individual volumes of ingredients. This is particularly important with the admixture of aqueous and nonaqueous polar systems such as alcohol-water combinations.
Calibrated Medicine Droppers
Calibrated medicine droppers are often used to deliver small doses of liquid medication, 1 ml or less, to the patient. Precision and accuracy of dose from droppers can be very poor. Problems arise from the false assumption that a close relationship exists between a drop and the volume of any liquid. The size of a drop of any liquid will vary not only with differences in the construction and composition of the dropper, but also with the viscosity, surface tension, and density of the liquid. Personal factors also contribute to the problem. Two individuals dispensing the same liquid from identical droppers may produce drops of different sizes because of variations in the pressure, speed of dropping, and the angle at which the dropper is held.
In an effort so standardize the dropper, the United States Pharmacopoeia/National Formulary (USP/NF) has recognized an official medicine dropper which is designed to deliver 1 ml of water in 20 drops with an allowable 10% deviation (± 2 drops). This stipulation does not appreciable improve the problem.
Some commercially produced medications are packaged with a marked dropper which as has been calibrated with that preparation. In order to maximize accuracy of dosing of a compounded solution from a medicine dropper, the pharmacist must calibrate the dropper with the intended solution at the time of delivery.
Volumetric Flasks
Volumetric flasks are used to prepare solutions of a specific volume and concentration. Because of their shape, the pharmacist would not reasonably expect them to deliver their full volume.

Conical and Cylindrical Graduates
Conical and cylindrical graduates are used to contain as well as to deliver specific volumes of liquids.
Erlenmeyer Flasks, Beakers, and Prescription Bottles
Erlenmeyer flasks, beakers, and prescription bottles are not volumetric devices and should NOT be used to measure liquids. “Graduation” marks on such vessels are only approximations of liquid capacity. These devices should only be used to mix or store solutions or other liquid preparations, unless you first calibrate them to a known volume.
Teaspoon
The Teaspoon and the problem concerning the actual volume of liquid contained in a “teaspoonful” has existed for many years. Despite various recommendations, the problem persists. Patients continue to self-administer liquid doses from spoons which, in all probability, are far from standard.
The U.S. Pharmacopoeia/National Formulary (USP/NF) recognizes the problem and provides the following statement: “Agreement has not been reached on a standard official teaspoonful, in spite of the need for such a standard measure in connection with compounding and labeling liquid medicines. For household purposes, an American Standard Teaspoon has been established by the American Standards Association as containing 4.95 ± 0.24 ml. In view of the almost universal practice of employing teaspoons ordinarily available in the household for the administration of medicine, the teaspoon may be regarded as representing 5 ml.” Household measures are, however, far from standard. Teaspoons may be found with capacities ranging from 3 to 7 ml and the volume of liquid which may be held in a given teaspoon varies with the viscosity and surface tension of the liquid. Thus, the dosage becomes an almost unpredictable variable. Errors in dosage can be minimized by:
- Writing and formulating all prescriptions using the metric system of measure.
- Using the symbol for one fluid dram in the dosage instructions to represent one teaspoonful.
- Requesting physicians to designate on the prescription the number of ml or mg desired in each dose.
- Dispensing a standard calibrated teaspoon, oral syringe, or other calibrated measuring device with each prescription for an oral liquid where such a dosage is used.
- Always select the smallest device (graduate, pipet, syringe) that will accommodate the desired volume of liquid. This will minimize the potential for errors of measurement associated with misreading the scale.
- Use a graduated pipet, syringe, or calibrated dropper to measure/deliver volumes <1 ml.
- Remember that oily and viscous liquids will be difficult to remove from graduates and pipets, and at best require long drainage time. Consider using a disposable syringe instead, or better yet, measuring by weight rather than volume.
- Never use prescription bottles, nonvolumetric flasks, beakers, or household teaspoons as measurement devices, unless you calibrate it yourself.
- When small (<5 ml) or very accurate doses are required, provide the patient with a calibrated dropper, oral syringe, or similar device to ensure proper dosing.